
Connecting a new sensor to your WiFi
Adding a sensor, or moving one to another room? You set up its WiFi through a short setup screen on your phone. No app, no cable. Below you can read exactly how it works and which network settings are most reliable.
A sensor that cannot find its network opens its own setup page
When you switch on a new sensor for the first time, or move a sensor to a place with a different network, it can no longer find a WiFi network it knows. Instead of going silent, it starts its own temporary WiFi network with a setup page. You connect your phone to that network and enter your WiFi details. As soon as the sensor connects, the setup network disappears by itself.
Why this is handy
You do not have to install anything or plug in a cable. A relocated sensor first tries its old network again (in case it was only a brief outage), and then opens the setup by itself. That way you never lose a sensor: it simply waits until you give it a new network.
Connecting in four steps
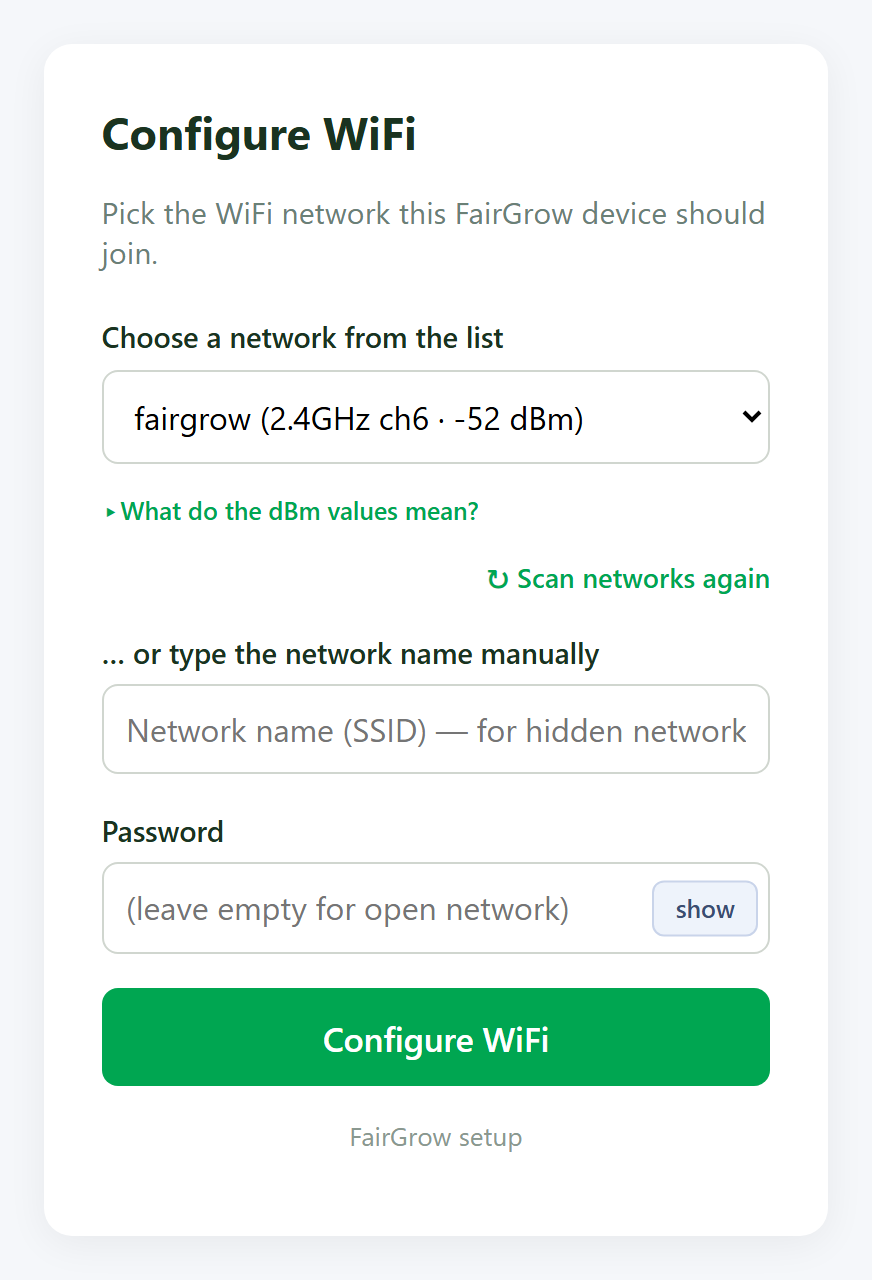
The setup screen below appears on your phone as soon as you connect to the sensor’s temporary network. On most phones it opens by itself, just like the login page on hotel WiFi.
Connect to the setup network
Look in your WiFi list for a network that starts with FairGrow-setup and connect to it. This network does not need a password.
The setup screen opens
On most phones a window appears automatically. If not, open your browser and go to 192.168.4.1.
Choose your network and enter the password
Select your WiFi from the list of networks found, or type the name manually and enter the password. Pay close attention to capital letters and special characters.
Done
The sensor saves your details, restarts briefly and connects to your network. The setup network disappears and the sensor starts measuring.
WPA2 and 2.4 GHz: the settings that work reliably
The sensors run on the ESP32, a widely available microcontroller. It connects most reliably on WPA2-PSK (AES) and on the 2.4 GHz band. Use these settings on your access point and connecting goes smoothly.
Sensor connects, but keeps dropping out?
This is often down to the security mode. On a network that only uses WPA3, or on a mixed WPA2/WPA3 mode where Protected Management Frames (PMF) are mandatory, the sensor finds the network, but the last step of connecting (the handshake) fails. Switch the network to WPA2-PSK and that usually fixes it straight away. The symptom looks like a wrong password, so also check that the password is exactly right.
In short
Security set to WPA2-PSK (AES/CCMP), band set to 2.4 GHz, and PMF set to optional rather than mandatory. That is the combination our sensors connect to most reliably.
What about 5 GHz? For sensors, usually not a good idea
We are sometimes asked whether 5 GHz would be more modern.
Here are both sides, honestly.
What is available
The ESP32-C5 is the first RISC-V microcontroller with dual-band Wi-Fi 6 on both 2.4 and 5 GHz, plus Bluetooth 5 LE and IEEE 802.15.4 (Zigbee 3.0, Thread). All classic ESP32s, the C3 and the C6 we use as a coordinator are limited to 2.4 GHz.
Boards are readily available by now: Seeed offers a XIAO ESP32-C5, Waveshare an ESP32-C5-WROOM-1 devkit, and Olimex has one too. So dual-band is possible on this hardware, technically speaking.
Why we advise against it for garden, greenhouse and field
Physically, 5 GHz has a shorter range and gets through walls, glass, crops and humid air less well than 2.4 GHz. In a greenhouse or a field, which is exactly your situation, that is the opposite of what you want. Your sensors are often far from the access point. On 2.4 GHz you cover that distance, on 5 GHz probably not.
On top of that, 5 GHz in the EU uses DFS channels (radar detection), so an access point can switch channels without warning and your sensors have to reconnect. For devices that need to keep measuring quietly day and night, that is inconvenient.
Our choice
For range and stability we deliberately choose 2.4 GHz. If you do want to use dual-band hardware, the ESP32-C5 is an option, but keep in mind that on 5 GHz you often have to stay closer to the access point.
Connecting a sensor: frequently asked questions
My sensor won’t connect. What should I check?
Check three things: is your network set to WPA2-PSK (not WPA3 or mixed with mandatory PMF), is it a 2.4 GHz network, and is the password exactly right? A failed handshake often looks like a wrong password.
The setup screen does not open by itself.
Connect your phone to the FairGrow-setup network and then open your browser and go to 192.168.4.1. If needed, turn off mobile data for a moment so your phone does not send the request over the mobile network.
Does 5 GHz really not work?
It can, on specific hardware such as the ESP32-C5. But for range in gardens, greenhouses and fields we recommend 2.4 GHz, because that signal reaches further and gets through walls, glass and crops better.
Do I need to install an app?
No. Setting up is done entirely through your browser, on any phone or laptop. No app is needed.
What happens if I move a sensor to a different network?
The sensor first briefly tries its old network. If it cannot find it, it opens the setup screen again by itself, so you can enter the new network. See also open ESP32 hardware and the right sensor in the right place.
Ready to expand your measurement network?
Tell us about your location and we will help you choose the right sensors and network. We are happy to set up a no-obligation pilot for you.